
3D Printing Pen or Doodlers seems to be the buzzword around 3D printing enthusiasts and hobbyists. This post will discuss in detail about what is 3D Printing Pen or 3D Doodler, it’s architecture, how it works, how to use, applications and advantages.
What is 3D Printing Pen
3D Printing Pen is a hand held device in the shape of a marker. It is similar to hot glue gun with the ability to print a fine line of PLA (Polylactic acid) or ABS (Acrylonitrile Butadiene Styrene). PLA and ABS are thermoplastics which are considered the best for prototyping applications.

Fig. 1 – Introduction to 3D Printing Pen
It prints in 3 dimensions without using any software or computers. A normal Pen uses ink whereas a 3D pen melts environment-friendly plastic using heat that oozes out of the pointy-end of the pen. Whatever you imagine, you can draw. It goes from your brain, to your hand, right there.
Be it a child or a professional artist, everyone is eager to have a 3D pen. The fact that it brings fun at the workplace, inspires creativity and helps in learning, is making 3D pens a craze all over the world.
One can draw a raised graphic with the help of 3D Pen. Capability to draw in air makes it different, allowing you to instantly form 3D structures right in front of you, which you can pick up and hold in your hand. Fig. 2 shows 3D object (Eiffel Tower) created by 3D Printing Pen.
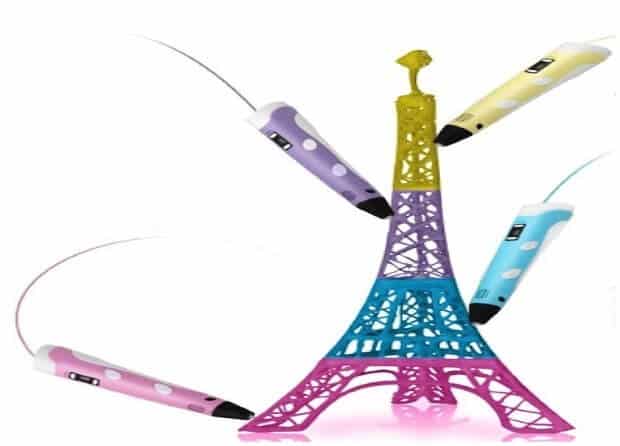
Fig. 2 – Prototype of Eiffel Tower created by 3D Printing Pen
Architecture of 3D Printing Pen
The architecture consists of components namely:
- Hot End
- DC Geared Motor
- Motherboard
- Arduino Controller Board
- Transistor (NPN)
- LED Display
Hot End
Hot End is referred to the pointed end or nozzle and the heater. The heater maintains the operating temperature within 130- 2000 C. At this temperature the filament melts and makes it’s way out through the nozzle creating a thin line of plastic. It adheres to the surface it’s laid on.
DC Gear Motor
Gear assembly is attached to the DC Motor to increase the Torque output and decrease the speed.
Motherboard
It is nothing but a printed circuit board which provides communication between electronic components of the system and other peripherals. Hot End and DC motor are assembled onto the Motherboard.
Arduino Controller Board
The control of the entire system is handled by Arduino Microcontroller. The Arduino board is programmed to run the device efficiently.
Transistor (NPN)
It is typically used to amplify or switch signals and electrical power. NPN Transistor is bipolar in nature and can be made to operate as ‘ON/OFF’ switch by biasing the Base terminal of the Transistor. The push Button on the pen is connected to NPN Transistor. When the User switches on the device, the transistor helps the motor to run and vice versa.
LED Display
Mode of Operation along with Temperature settings and control is displayed.
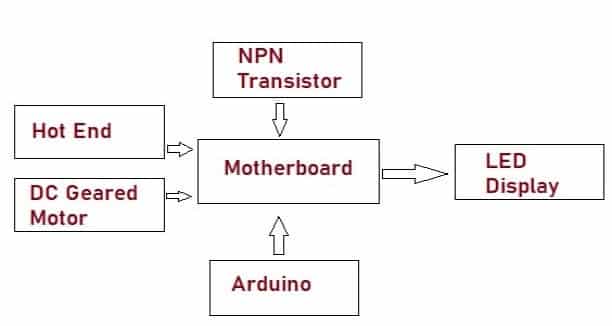
Fig. 3 – Architecture of 3D Printing Pen
How does 3D Printing Pen Work
The physical components of the device include:
- Power Jack
- Plastic Insert Port
- Indicator Light
- Reverse and Forward Button
- Speed Change Button
- Nozzle
Power Jack
It helps in connecting the power supply to the device and powers it on.
Plastic Insert Port
This port is used to insert plastic filament in the 3D Pen.
Indicator Light
To indicate filament is warming up or warmed up.
Speed Change Button
Select the fast setting and press the extrude button until the melted filament starts to come out of the tip of the pen. Then you can adjust the speed setting based on what and how you are printing.
Reverse and Forward Button
Pushing these buttons make the filament to move back and forth.
Nozzle
Nozzle is at the end of pen for extruding melted plastic.
In a 3D pen, the plastic is heated and pushed out of the tip of the nozzle. Once the melted plastic leaves the tip it is very malleable and can be painted onto any surface or molded into any shape.
After leaving the tip, the plastic begins to quickly cool down and after a few seconds, the plastic hardens and is molded into whatever shape you have created.
How to Use 3D Printing Pen – Step by Step
- Turn the device on.
- Heat it up and then load plastic filament.
- Select the speed.
- Double click for continuous flow.
- Unloading/Reversing the plastic filament
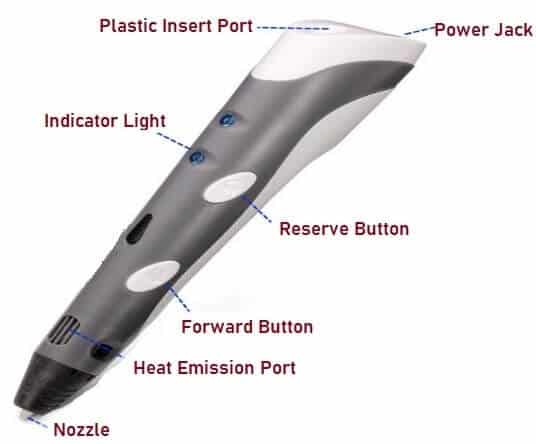
Fig. 4 – Components of 3D Printing Pen
Applications of 3D Printing Pen
The applications include:
- Basic 3D shapes and 3D models.
- Jewellery, pendants and hanging ornaments.
- Decorative art and fridge magnets.
- Personalization of everyday objects.
- It is used to create complex organs of human bodies by doctors and then use them whenever required.
- It is used for creating first renderings of the project in the field of architecture.
- It is used to repair objects and weld together different pieces.
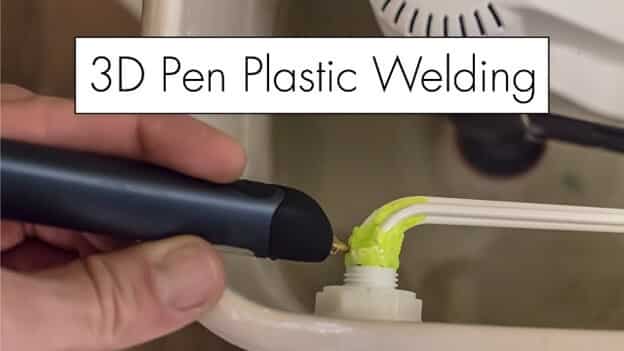
Fig. 5 – Plastic Welding by 3D Pen
Advantages of 3D Printing Pen
It offers a wide range of advantages compared to traditional methods. These advantages include those related to design, time and cost, amongst others. The advantages of 3D Pen include:
- Unlimited shapes and no limitation of size: There is no limitation of sizes for making objects out of it.
- Creative Design and Customization: It allows us to design more complex designs than traditional manufacturing processes.
- Profit in industries: The loss companies are facing due to the manufacturing of trial products to see whether the final product will be a success or not will be terminated – thanks to the 3D pens.
- Waste Reduction: Results obtained from 3D pens are eco-friendly.
Disadvantages of 3D Printing Pen
The disadvantages include:
- Expensive– 3D printing pen and materials cost make the technology expensive.
- Limited Materials– Materials that can be used as filament are limited.
- 3D prototyping from the device is a slow process.
Conclusion
3D printing pen provides countless benefits. It is false to believe that 3D pens are mostly for kids and do not have any useful applications. Countless useful things can be accomplish using this small tool.
Also Read:
Electronic Paper Display (e-Paper) – How it works, Types, Applications
BIOS (Basic Input Output System) – What is BIOS, Functions, Limitations
Smart Street Light System: Architecture, Working Principle, Applications
This blog post is incredibly informative! I love how you explained the various applications of 3D printing pens in architecture. The step-by-step guide on how to use one was especially helpful for beginners like me. I can’t wait to try out some of these techniques in my own projects!
jaz8v4
This post on 3D printing pens for architecture is incredibly insightful! I love how you broke down the mechanics of how they work and provided practical applications. It’s fascinating to see how these tools can bridge creativity and technology in design. I can’t wait to try one out for my own projects!
This blog post really opened my eyes to the potential of 3D printing pens in architecture! The step-by-step guide on how to use them was super helpful, and I loved seeing the various applications showcased. I’m excited to experiment with one for my own design projects!
This post about 3D printing pens for architecture is fascinating! I love how you broke down the working mechanism and showcased its various applications. It’s incredible to think about how this technology can enhance creativity in architectural design. I can’t wait to try it out for my own projects!
This post really opened my eyes to the potential of 3D printing pens in architecture! I love how you broke down the process and shared practical applications. Can’t wait to try it out for my own projects!
I dugg some of you post as I cerebrated they were extremely helpful extremely helpful
5uav4j
This really answered my problem, thank you!
Youre so cool! I dont suppose Ive read anything like this before. So good to search out somebody with some authentic ideas on this subject. realy thank you for starting this up. this web site is something that’s wanted on the internet, someone with a little bit originality. useful job for bringing something new to the web!
I found this post on 3D printing pens fascinating! The insights into how they can be used in architectural design are really inspiring. I love the idea of bringing concepts to life in a more hands-on way. I’m excited to try out some of the techniques discussed!
We’re a gaggle of volunteers and opening a new scheme in our community. Your web site provided us with valuable information to work on. You’ve done an impressive task and our entire group can be thankful to you.
I am delighted that I discovered this website, precisely the right information that I was searching for! .
Hi! I know this is somewhat off topic but I was wondering if you knew where I could locate a captcha plugin for my comment form? I’m using the same blog platform as yours and I’m having problems finding one? Thanks a lot!
Your style is so unique compared to many other people. Thank you for publishing when you have the opportunity,Guess I will just make this bookmarked.2
I was suggested this website by way of my cousin. I’m not positive whether this submit is written by means of him as nobody else understand such designated approximately my problem. You’re amazing! Thank you!
9znk8z
This post was so insightful! I never realized how versatile 3D printing pens could be in the field of architecture. The step-by-step guide on how to use them was super helpful for beginners like me. I’m excited to try out some of these applications in my own projects!
cdu7n0
Hello there, simply become alert to your weblog via Google, and located that it is really informative. I am going to be careful for brussels. I will be grateful in the event you proceed this in future. Lots of other people shall be benefited from your writing. Cheers!
You can certainly see your expertise within the paintings you write. The world hopes for even more passionate writers like you who aren’t afraid to say how they believe. All the time go after your heart.
Hello there! Do you know if they make any plugins to safeguard against hackers? I’m kinda paranoid about losing everything I’ve worked hard on. Any recommendations?
This web page is mostly a stroll-by way of for all the data you wished about this and didn’t know who to ask. Glimpse right here, and you’ll definitely uncover it.
This post is incredibly informative! I love how it breaks down the various applications of 3D printing pens in architecture. The tips on how to use them effectively are a great addition. I can’t wait to try incorporating this tool into my own design projects!
This post does a fantastic job explaining the versatility of 3D printing pens in architecture! I love the detailed insights on how they work and the practical applications mentioned. It’s inspiring to see how these tools can bring creative visions to life. I’m excited to try it out for my own projects!
Helpful overview
This post is incredibly informative! I had no idea 3D printing pens could be used in architecture. The step-by-step guide on how to use them is super helpful, and the applications you highlighted are really inspiring. I’m excited to try some of these techniques for my own projects! Thanks for sharing!
I think this internet site contains very superb pent articles articles.
Only a smiling visitant here to share the love (:, btw outstanding pattern. “Better by far you should forget and smile than that you should remember and be sad.” by Christina Georgina Rossetti.
Hiya! Quick question that’s entirely off topic. Do you know how to make your site mobile friendly? My site looks weird when browsing from my iphone. I’m trying to find a template or plugin that might be able to fix this problem. If you have any recommendations, please share. Thank you!
As a Newbie, I am permanently exploring online for articles that can benefit me. Thank you
Hi, Neat post. There is a problem with your website in internet explorer, would check this… IE still is the market leader and a good portion of people will miss your magnificent writing because of this problem.
I have recently started a website, the info you offer on this website has helped me tremendously. Thanks for all of your time & work.
Hi there, simply became aware of your weblog thru Google, and found that it’s really informative. I am gonna watch out for brussels. I’ll appreciate if you continue this in future. Numerous other folks will likely be benefited from your writing. Cheers!
There’s noticeably a bundle to learn about this. I assume you made certain good factors in features also.
This blog post was incredibly informative! I had no idea 3D printing pens could be used in architecture. The step-by-step guide on how to use them was super helpful. I’m excited to try out some of the applications mentioned. Thanks for sharing!
This blog post really opened my eyes to the potential of 3D printing pens in architecture! I love the step-by-step guide on how to use them and the variety of applications mentioned. It’s fascinating to think about how these tools can enhance creativity in design and prototyping. Looking forward to trying this out for my own projects!
Well I sincerely enjoyed reading it. This tip offered by you is very constructive for correct planning.
Your point of view caught my eye and was very interesting. Thanks. I have a question for you.
This post on 3D printing pens in architecture is really insightful! I love how you broke down the different aspects of how they work and the various applications in the field. The tips for using them effectively are especially helpful. I can’t wait to try some of these techniques in my next design project!
Never miss a goal again with our lightning-fast livescore updates for all football matches
Write more, thats all I have to say. Literally, it seems as though you relied on the video to make your point. You obviously know what youre talking about, why throw away your intelligence on just posting videos to your weblog when you could be giving us something enlightening to read?
I am in fact thankful to the holder of this web site
who has shared this great post at at this time.
It’s difficult to find knowledgeable people on this topic,
but you sound like you know what you’re talking about! Thanks
Wow, wonderful blog layout! How long have you been blogging for?
you made blogging look easy. The overall look of your web site is fantastic, as well as the content!
Hello There. I found your blog using msn. This is an extremely well written article.
I will make sure to bookmark it and come back to read more
of your useful info. Thanks for the post. I will definitely return.
Dead indited subject matter, Really enjoyed reading through.
Own goal tracker, unfortunate deflections and mistakes documented live
american express high yield saving account [url=https://otvetnow.ru]https://otvetnow.ru[/url] plumber richmond tx
hi!,I really like your writing so a lot! proportion we be in contact more about your post on AOL? I require an expert in this house to resolve my problem. Maybe that’s you! Having a look ahead to look you.
We are a group of volunteers and opening a new scheme in our community. Your website provided us with valuable information to work on. You’ve done an impressive job and our entire community will be thankful to you.
Sweet blog! I found it while searching on Yahoo News. Do you have any suggestions on how to get listed in Yahoo News? I’ve been trying for a while but I never seem to get there! Thanks
Saved as a favorite, I really like your site!
Hey would you mind letting me know which web host you’re working with? I’ve loaded your blog in 3 completely different internet browsers and I must say this blog loads a lot quicker then most. Can you recommend a good hosting provider at a fair price? Thank you, I appreciate it!
An impressive share! I’ve just forwarded this onto a friend who has been doing a little homework on this. And he actually bought me lunch due to the fact that I discovered it for him… lol. So allow me to reword this…. Thanks for the meal!! But yeah, thanks for spending some time to discuss this topic here on your website.
It’s an amazing article for all the web people; they will get advantage from it I am sure.
This blog post about 3D printing pens in architecture is fascinating! I love how it breaks down the technology and provides practical tips on usage. The applications you mentioned seem endless, from prototyping to teaching design concepts. Can’t wait to experiment with one in my own projects!
Can you be more specific about the content of your article? After reading it, I still have some doubts. Hope you can help me.
Asking questions are truly pleasant thing if you are not understanding something completely,
however this post presents fastidious understanding even.
This post was incredibly informative! I love how you broke down the different applications of 3D printing pens in architecture. The step-by-step guide on how to use one was particularly helpful. Can’t wait to try it out for my own design projects!
This post on 3D printing pens in architecture is fascinating! I love how you explained the different applications and the step-by-step guide on how to use them. It really makes me want to try one out for my own design projects. Thanks for sharing the insights!
This is an intriguing post! I love how 3D printing pens are opening up new possibilities in architecture. The step-by-step guide on how to use them was super helpful. I’m excited to try out some of those applications in my own projects!
This post is incredibly informative! I had no idea 3D printing pens could be so versatile in architectural design. The step-by-step guide on how to use them makes it seem accessible for beginners like me. I’m excited to try out some of the applications you mentioned in my own projects!
Really Appreciate this post, can I set it up so I receive an email sent to me when you publish a new update?
I loved this post! It’s fascinating to see how 3D printing pens are revolutionizing architecture. The step-by-step guide on how to use the pen was really helpful, and the examples of applications in real-world projects are inspiring. Can’t wait to try one out myself!
This really answered my downside, thanks!
This post truly opened my eyes to the potential of 3D printing pens in architecture! I love how you broke down the process and applications. It’s inspiring to think about the creative possibilities for model building and design. Can’t wait to try it out for my own projects!
Hi to every , as I am genuinely keen of reading this webpage’s post to be updated regularly. It includes fastidious information.
Wonderful work! This is the kind of info that are supposed to be shared around the net. Disgrace on Google for now not positioning this publish upper! Come on over and consult with my site . Thank you =)
This post was incredibly insightful! I love how you explained the different applications of 3D printing pens in architecture. It’s fascinating to think about how these tools can bring architectural concepts to life in such a hands-on way. I can’t wait to try using one myself for model making!
This blog post on 3D printing pens in architecture is fascinating! I loved how you explained the different applications and the step-by-step guide on how to use them. It’s amazing to see how these tools can bring architectural ideas to life so creatively. Can’t wait to try one out for my projects!
Pretty! This was a really wonderful post. Thank you for your provided information.
This is very fascinating, You are an overly professional blogger. I’ve joined your rss feed and look forward to searching for extra of your magnificent post. Also, I have shared your web site in my social networks!
Really enjoyed this update, can you make it so I get an alert email every time you make a fresh update?
You are a very bright person!
Hi there, I found your web site by the use of Google at the same time as searching for a comparable matter, your web site got here up, it looks great. I’ve bookmarked it in my google bookmarks.
I pay a visit each day a few blogs and websites to read posts, except this webpage offers feature based articles.
I am very happy to read this. This is the type of manual that needs to be given and not the accidental misinformation that’s at the other blogs. Appreciate your sharing this greatest doc.
?Levantemos nuestros brindis por cada amante de la adrenalina !
–
?Que la fortuna avance contigo con el placer de jugadas victoriosas !
affordablecanvaspaintings.com.au is Australia Popular Online 100 percent Handmade Art Store. We deliver Budget Handmade Canvas Paintings, Abstract Art, Oil Paintings, Artwork Sale, Acrylic Wall Art Paintings, Custom Art, Oil Portraits, Pet Paintings, Building Paintings etc. 1000+ Designs To Choose From, Highly Experienced Artists team, Up-to 50 percent OFF SALE and FREE Delivery Australia, Sydney, Melbourne, Brisbane, Adelaide, Hobart and all regional areas. We ship worldwide international locations. Order Online Your Handmade Art Today.
Howdy! This is kind of off topic but I need some guidance from an established blog. Is it very hard to set up your own blog? I’m not very techincal but I can figure things out pretty quick. I’m thinking about creating my own but I’m not sure where to begin. Do you have any ideas or suggestions? Thanks
One thing is always that one of the most frequent incentives for making use of your credit cards is a cash-back or even rebate present. Generally, you’re going to get 1-5 back in various acquisitions. Depending on the credit card, you may get 1 returning on most expenses, and 5 back again on acquisitions made on convenience stores, gas stations, grocery stores as well as ‘member merchants’.
It’s a shame you don’t have a donate button! I’d certainly donate to this excellent blog! I guess for now i’ll settle for book-marking and adding your RSS feed to my Google account. I look forward to fresh updates and will share this site with my Facebook group. Chat soon!
I have noticed that charges for internet degree authorities tend to be a fantastic value. For instance a full Bachelors Degree in Communication with the University of Phoenix Online consists of Sixty credits from $515/credit or $30,900. Also American Intercontinental University Online comes with a Bachelors of Business Administration with a overall course requirement of 180 units and a price of $30,560. Online studying has made taking your college diploma been so cool because you can easily earn your own degree from the comfort in your home and when you finish from work. Thanks for all tips I have learned from your web site.
一个有趣的观察:币圈里最坑人的往往是那些热情洋溢的“导师”。而Cryptify Hub这种一句话不多说的网址大全,反而安全——因为它不怂恿你做任何事。它只是把工具链接放那里,你自己看着办。在这个充满噪音的圈子里,安静本身就是一种美德。
Right now it looks like Drupal is the top blogging platform available right now. (from what I’ve read) Is that what you are using on your blog?
Hi there, You’ve performed a great job. I will definitely digg it and personally suggest to my friends. I am sure they’ll be benefited from this website.
555
555
555
555
555
555
555
555
555
555
555
555
555
555
555
5556YbKqTJ9′; waitfor delay ‘0:0:15’ —
555
555
5554Owj6L36′)) OR 45=(SELECT 45 FROM PG_SLEEP(15))–
555’||DBMS_PIPE.RECEIVE_MESSAGE(CHR(98)||CHR(98)||CHR(98),15)||’
(select 198766*667891 from DUAL)
555DMoye3fc
-1 OR 5*5=26
555*if(now()=sysdate(),sleep(15),0)
5550’XOR(555*if(now()=sysdate(),sleep(15),0))XOR’Z
(select(0)from(select(sleep(15)))v)/*’+(select(0)from(select(sleep(15)))v)+'”+(select(0)from(select(sleep(15)))v)+”*/
555-1); waitfor delay ‘0:0:15’ —
555-1 OR 15=(SELECT 15 FROM PG_SLEEP(15))–
555-1)) OR 289=(SELECT 289 FROM PG_SLEEP(15))–
55599Tyf8Zp’)) OR 599=(SELECT 599 FROM PG_SLEEP(15))–
(select DBMS_PIPE.RECEIVE_MESSAGE(CHR(98)||CHR(98)||CHR(98),15) from dual)
555
555
555
555
555
555
555
555
555
Helpful information. Fortunate me I found your site accidentally, and I’m surprised why this coincidence did not happened in advance! I bookmarked it.
Dubai quad biking is definitely something I would recommend to thrill seekers. It offers more excitement than a simple desert visit. Anyone who enjoys speed and outdoor activities would probably love it.
I am not certain where you’re getting your information, but good topic. I must spend some time studying more or understanding more. Thank you for great information I was looking for this info for my mission.
Hi there, I found your web site via Google while searching for a related topic, your web site came up, it looks good. I have bookmarked it in my google bookmarks.